Recording your computer screen is relatively easy, but it can become more complex when recording tools prompt you to upgrade to a subscription, impose resolution limits, or add watermarks to the exported or saved recordings. Today, I’ll discuss my experience with screen recording tools and share some simple and free methods that might help you.
Over the last 10+ years, I’ve tried out many screen recording tools, both free and paid. I’ve used cracked versions, as well as limited-time access through gift cards or special coupons. Recently, I’ve come across some methods and applications that make it easy for me to record my screen for simple tasks. For instance, I use screen recording to explain or demonstrate software, themes, or plugin issues or to show improvements to my team or colleagues. However, I’ve found it a bit challenging due to the high prices of some applications that don’t quite match my needs and the compatibility issues on Windows devices.
Some of the apps I use daily for making screen recordings include the following:
 Awesome Screen Recorder: The “Awesome Screen Recorder” is simple and easy to use. In the free version, you can capture 20 videos in 720p resolution and share them with anyone without any hassle. Once you’ve recorded 20 videos, you will be notified, but you can still capture an unlimited number of screen recordings. However, you won’t be able to share them until the number of recorded videos drops below 20.
To know more about “Awesome Screen Record” and explore the recorder, I have attached the necessary links:
 Loom: Loom is a popular screen recording tool with several efficient features. The free version allows you to record your screen, download the recordings, and share them with others. However, there are limitations in the free version, which can be disappointing. Some users have reported issues with the Windows application when using the Chrome extension, particularly after a recent major update. In the free plan, there may be restrictions on recording your screen, even after deleting existing videos to free up space. For team collaboration or corporate use, consider exploring their premium package, which unlocks all features and provides dedicated support for technical difficulties. You can explore the Loom App by clicking the links below.
Screencastify: Screencastify is a free screen recording tool that allows you to make 10 screen recordings for free, with each recording’s duration capped at a maximum of 30 minutes. You can easily sign up for Screencastify using the Sign-In Integration. They also offer various pricing plans and features, but overall, it’s a simple and great screen recording tool that I have used. Helpful links:
Vimeo: It’s a popular video streaming platform that offers the option to create screen recordings for various purposes, such as creating content, conducting meetings, and expanding capabilities for online courses. Unlike other platforms, Vimeo does not have an exact limit for screen recording duration in its free plan, but it does provide 1GB of storage for one member with no option to extend or increase seats. However, users can record unlimited videos and get a maximum of 2TB of bandwidth per month. In my experience, I’ve noticed that the platform tends to be a bit slow when finishing a recording. Sometimes, there is a delay in receiving notifications after clicking the “Stop” button, and the recorded content takes time to appear in the gallery or list. Additionally, there are no AI tools or features available in the free plan.
I feel you are now bored because all the apps or methods mentioned have some limitations. Even It is very annoying when you can’t record the screen with an optimal resolution; instead, the applications only allow you to create 720p resolution while using the free plans. To overcome this, you can explore desktop applications that offer more flexibility or even use free editing tools to enhance your recordings.
While some apps may have a price tag, there are free alternatives available. However, it’s important to avoid cracked or pirated applications, as these can pose serious risks to your device and your security. It’s always better to use legitimate, licensed products or seek out free but authorized solutions.
Now, let’s dive into the best and easiest desktop applications designed for Windows that will help you pass the limitations of online tools. These apps will allow you to record in higher resolutions and even edit your videos in 1080p, all while enhancing your workflow without the restrictions of free online tools.
01. Windows Game Bar: For gamers, this is an excellent option to capture the screen during gameplay, offering maximum resolution based on your monitor’s capabilities. However, it’s not ideal for basic screen recording, as it automatically disables when you’re not in game mode. While it occasionally works during browsing, it’s primarily designed for capturing games.

To start recording, press Win + G to bring up the Game Bar interface. From here, you’ll see detailed statistics on CPU usage. Navigate to the Capture tab and click the Record (⚫) icon to begin recording.
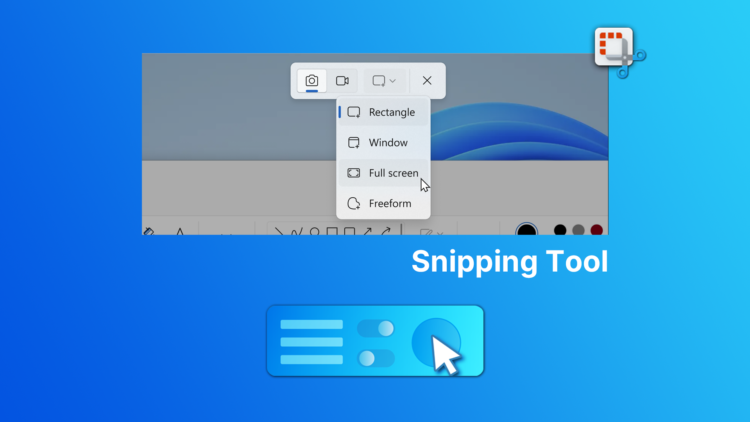
02. Snipping Tool: This is one of the best, simplest, and most user-friendly tools for everyday screen recording tasks. Although traditionally used for capturing screenshots, it now includes a screen recording feature as well.

To access it, press Win + Shift + R on your keyboard, which opens the options to either take a screenshot or start recording your screen. Before recording, select the area you want to capture by dragging your mouse pointer over the desired section or choose the full screen. Once you’ve finished recording, save your video by clicking the familiar Save () icon in Windows.
Now, you need to customize the video by cutting some frames, adding audio, or removing the video background audio. You can also add other effects or even turn it into a full tutorial by enhancing it with text effects, overlays, and adjusting playback speed. But what’s the solution for doing all this for free, right?
I used to use Camtasia, Filmora, Power Director, and other applications, but the default Windows integration made me switch to using only “Microsoft Clipchamp” for simple and visual work. If you haven’t heard of Microsoft Clipchamp yet, you can follow the link and look it up for tutorials.
https://clipchamp.com/en/video-editor
If you just need to customize your screen record as expected, I recommend using the “Snipping Tool” to record the screen and then opening the recorded file using Clipchamp to customize your video as guided by Clipchamp.
I hope this article will be helpful if you are looking for a free screen recorder and video editor for Windows. This software makes recording and customizing videos hassle-free, allowing you to work faster and simpler.


